One of the most useful things a local IT department can do when confronted with a security event is capture information. A fresh dataset, captured hours or days after an event can be crucial in order to answer important questions at a later stage. Once captured in a standard manner, the digital footprints are “frozen” and ready to be analyzed months or years later.
The argument between professional capture and software-only capture is a valid one. Professional capture uses specialized equipment to capture media (we use Forensic Ultradock from CRU for commercial engagements https://www.cru-inc.com/products/wiebetech/forensic-ultradock-v5-5/) and also maintains detailed photographic and written documentation about the chain of custody of media. This is essential for the forensic report to stand scrutiny in court or to be taken seriously as an analysis in international jurisdictions.
The use of write-blocking equipment is also useful to the team capturing data, as it stops them from accidentally writing to the drives in case their capturing setup is misconfigured. Overwriting a laptop hard drive when attempting to image it overnight can be serious problem. Write-blocking equipment can also skip bad blocks on damaged hard drives, errors that would otherwise cause a forensic PC to freeze or stop capturing altogether.
Write blocking equipment will be a lot faster imaging drives using SATA/SAS connectivity on a dedicated forensic workstation, than using existing CPU limits and connectivity ports on the target device. Software Imaging a low powered laptop using USB normally peaks at 10-20MB/s, which will barely result on a 1GB per minute. With the average image being 120GB, a normal exercise would take 2 hours, with days being the norm for terabyte size drives.
However, write-blockers are hard to come by in Vietnam. We have found no distributors of CRU or Tableau equipment in country and we regularly source our forensic kit from Europe or the US. Write-blockers also rely on extracting the relevant hard drives from machines, which is hard to do on some target systems (Macbooks and other systems not designed to be taken apart easily).
Given the circumstances, appropriate use of software-only capture can be as effective if the relevant precautions are taken. This is what this tutorial is about.
Software write blocking
The easiest way to do a forensic capture of a machine (server, laptop, desktop) is by booting it with a USB with specialized software and capturing all the data (internal storage) to a external hard drive.
Materials:
- External hard drive of capacity at least equal and preferably higher to the internal hard drives of the device.
- USB pen drive of over 1GB in size
- DEFT Zero iso image available on this website
- Equipment to image.
Install DEFT Zero on a USB stick
Download the current DEFT Zero iso image from this website.The image is 530MB in size,so you will need a USB pen drive of 1GB or more. That USB drive does not need to be fast as it is only read to boot up the system.
To install the iso image as a bootable USB drive follow these tutorials:
1) Windows: Use Rufus (https://rufus.akeo.ie/) or the Microsoft CD/DVD imaging tool (https://www.microsoft.com/en-us/download/windows-usb-dvd-download-tool). Rufus is our preferred tool, as it is normally twice as fast as other tools.
Just insert the USB drive, ensure it is listed on the device drop down menu, click on the create bootable disk using ISO image, select MBR parition scheme for BIOS or UEFI (for a PC target) of GPT (for a Mac target) and select the deft zero iso image in question from the little CD drive icon. And click “Start”.

You will get a warning stating that the image you have selected is a “ISOHybrid” image. Just select the non-recommended option of writing the image in DD image mode.

The time taken will depend on the USB drive, but normally well under 5 minutes to image.
2) Linux and MacOSX: use UnetBootin (https://unetbootin.github.io/). You will need to have the pen drive with a single FAT partition (which is the default). Just follow the instructions with the existing ISO image (https://unetbootin.github.io/#install).
Boot the target computer with Deft Zero
If the target system is powered on, do not shut it down orderly. Just pull the plug at the back, or if a laptop either long press the power button, or remove the battery. Shutting a system down creates lots of logging and other file artifacts that would only make forensic analysis more complex.
For this we need to ensure the laptop in question can boot from a USB drive, the BIOS boot order will have to be changed to allow this (normally by pressing F12 after booting on a normal PC system, or “E” at startup on a Mac).

For this example, we are imaging a Acer Aspire one D260 onto an external 1TB Western Digital USB3 hard drive.

On the main screen, just boot with the memory preload (which should be possible as long as the target has more than 1GB of RAM) and will be a lot faster.

Once booted the system will not have any of the local drives available, not the USB drive or the internal hard drive. Deft Zero ensures that mounting a drive in writeable mode needs to be an explicit action by the user.

Connect the external hard drive and mount it read-write using the file manager. Just select the external driver and right-click to “Mount Volume”.Deft Zero will warn you that this is going to take place, as by default the live USB does not mount any of the local drives.


Once mounted, it will appear with a red icon on the file manager.

With the external disk ready to have files written to it, just start GuyMager (which is the imaging software we will use). A link to Guymager is on the main desktop.

The guymager main screen shows three disks. In our case disk WD10JFCX is the internal HDD (/dev/sda) and the WD Elements 1042 is the external hard drive. The third drive (linux loop) is the memory space Deft Zero uses to run the live USB.
To proceed to the acquisition of the internal drive, just right click on it, and select acquire image.

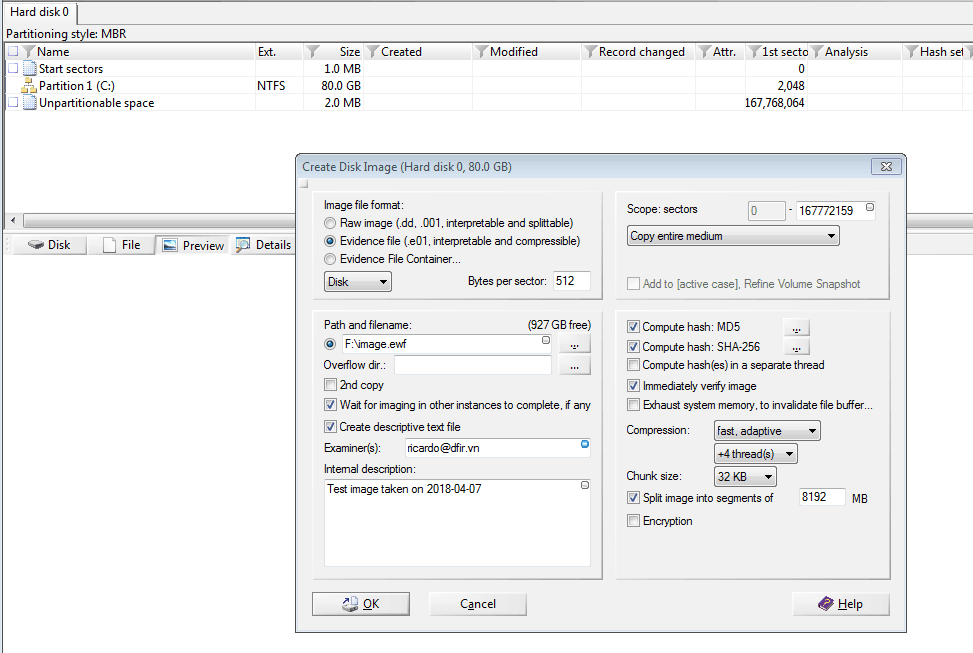
Image acquisition details should be entered, in order to keep track of different images of a case. Items like case number, evidence number, examiner, description must be entered in order to evidence to be adequately tracked.
Guymager supports two formats: Linux dd raw image and Expert Witness Format. Newer version of guymager also support the advanced forensic image format (AFF). Only DD and EWF support splitting the image onto subfile. This is recommended, as handling files larger than 4GB can be difficult on some filesystems (FAT). In this case we use EWF that support built-in metadata. EWF is a well supported format in most forensic packages (EnCase, Autopsy…etc).
Pay attention at the image directory, this should be the location where the external hard drive is available. This is typically /media/root/<DISKNAME>. In this particular case, image verification is selected (which will make sure no errors have taken place during the capture).

Select start and the capture will commence. Capture in software can take a long time depending on device. For this underpowered laptop the transfer speed was very poor (8-10MB/s).

Once the process is complete, the resulting image (in this case about ~150 files of 2GB in size each) can be processed at a later stage in order to perform a forensic analysis of the system state.